Pumpkin Whoopie Pies

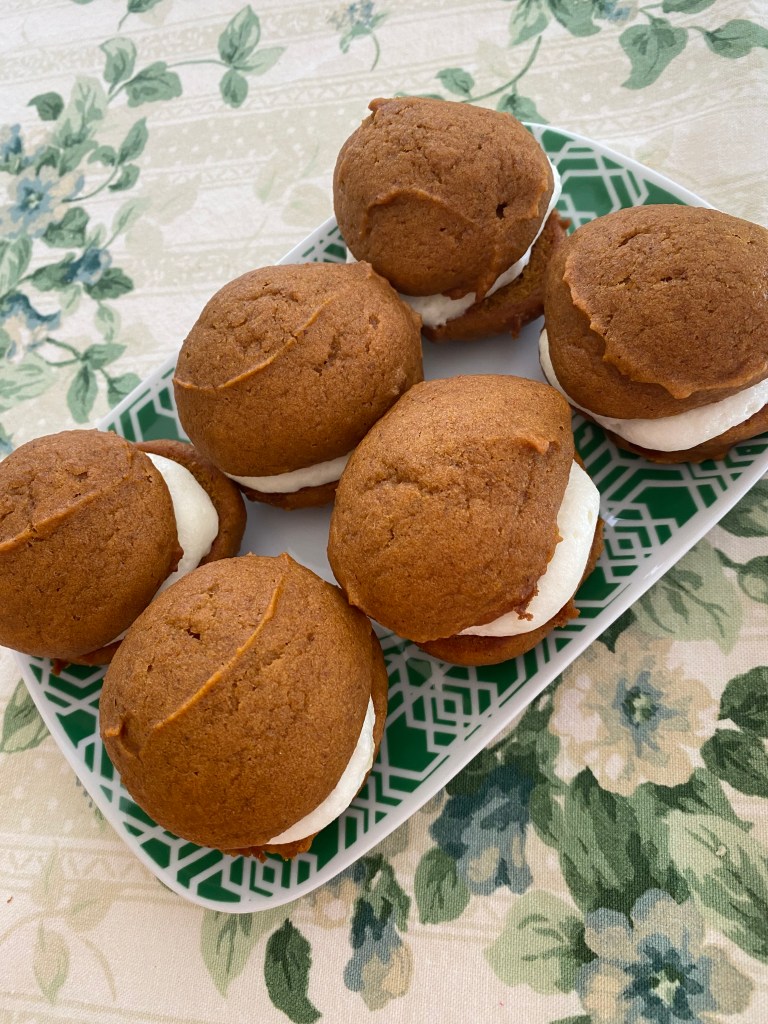
WARNING: While I love the flavor of these, I do not like how puffy they are. They wobble and topple over, causing the filling to ooze. But I’m in the process of making it better. I will continue to adjust and make note of it. I am putting the recipe here for all of you who love them! They are very tasty.

Beat together:

  • 2 cups light brown sugar
  • 1 cup vegetable oil

Add in and mix well:

  • 2 eggs
  • 29 oz. can pumpkin

Sprinkle over the top (do not dump on because they might clump together and then not blend into the mixture nicely):

  • 1 1/2 t. cloves
  • 2 t. ginger
  • 2 t. cinnamon
  • 1 t. salt
  • 1/2 t. baking soda
  • 1/2 t. baking powder
  • 1 c. lightly sifted flour

Mix well, scraping the bottom and sides of bowl so it is well mixed. You do not want any of the spices left on the edges!

Stir in:

  • 2 c. lightly sifted flour

Preheat oven to 350 degrees. I use the large Pampered Chef cookie scoop for making these cookies. The cookie spreads to about 2 1/2″ – 3″ size. It makes 5 dozen cookies, yielding 2 1/2 dozen whoopie pies.

Bake at 350 for 15 minutes. COOL ON THE COOKIE SHEET. When they are completely cool, fill them with the recipe for filling below. I use a plastic storage bag to “pipe” the filling on. I just snip the bottom corner of the bag and use it like a frosting decorating bag. It’s faster and cleaner for me than using a spoon to fill each one. Now, because they are topsy turvy, they are difficult to keep standing up. But try. Someone suggested using muffin papers. I used a pie plate, setting the bottom cookie down first to fill the entire pie plate, letting them touch to hold themselves upright. And then I “piped” the filling on, followed by placing the top part of the cookie on. Refrigerating these is a must. The filling will get too runny if you don’t. They also freeze well. Wrap them individually after they have been refrigerated, or set the whole container in. Whatever works for your life style! Good luck.

FILLING RECIPE:

  • 1/2 c. soft butter
  • 4 oz. cream cheese
  • 3 c. powdered sugar

Beat the butter for about 3 minutes. Add the room temperature cream cheese. Beat for another 2-3 minutes. Add 2 cups powdered sugar. Beat until well blended. Slowly add the remaining cup of powdered sugar. You want to have a soft filling, but if it’s too soft, it will just ooze out of the cookies. Temperature makes a difference. If the butter and cream cheese is cooler, then you won’t need as much powdered sugar. If it is warm and creamy, you will need to add more powdered sugar. It tastes good either way.

This photo is my actual picture that I took of the cookies that I made!

OVEN POTATOES

I start with a nice small potato. Reds are my favorite. This recipe is for a 5 pound bag. However, cut the recipe in half and just do 2 pounds! Or even just adjusting the seasoning to your preference.

Scrub the potatoes and place them in a roaster pan (or 9×13 pan). Cut any of the large potatoes if needed. When I use the baby potatoes, I will cut the large ones in half and leave the smaller ones whole. You can use regular large potatoes for this recipe also! Just cut them into 2″ chunks. Smaller dices will cook faster, but also might get a bit mushy unless you stir them frequently and catch them just as they are done, no over baking!

OK, on to the recipe:

In a small bowl mix together:

  • 1/2 c. olive oil
  • 1 T. granulated garlic
  • 1 T. granulated onion
  • 2 t. seasoning salt
  • 1 t. black pepper
  • 2 t. rosemary
  • 2 t. thyme
  • 1 t. basil
  • 1 T. parsley
  • 1/2 t. oregano

I use my hand to mix the seasoning into the oil very well. Pour the oil onto the potatoes. Again, using my hands, I rub the oil all over the potatoes to evenly coat them.

Bake at 350 degrees, stirring every 20 minutes for about 1 hour. Sometimes it seems that it takes a bit longer. The idea is to not let them get too mushy, but you don’t want any of them under cooked.

Coleslaw

  • 1 head cabbage chopped, diced, or shredded as desired
  • 2 medium carrots finely chopped or shredded

Sprinkle the following over the cabbage and carrots (do not just dump it in one place on the veggies!)

  • 2 t. granulated onion
  • 2 t. granulated garlic
  • 1/2 t. granulated sugar
  • 1 t. salt (add more if desired)
  • 1/2 t. black pepper
  • 2 t. dill weed
  • 1 T. apple cider vinegar

Dollop about 1/4 cup portions of mayonnaise in 4 places on top of the cabbage. That is 1 cup total of mayo! If you feel like there is not enough cabbage because you have a small head, start with only 1/2 the mayo. It’s easier to ADD mayonnaise than take it out. Also, some people like less dressing on their slaw, so again, start with less and add if needed. PLEASE keep in mind that after the coleslaw sets for an hour or more it will “weep” more moisture, softening the cabbage and creating more dressing!

Peach Icy

  • Summer in a cup starts with using a good blender. Put into the blender in order given:
  • 1 medium/large peach or 2 small peaches
  • 1/4 cup water
  • 1/4 cup sugar
  • 2 cups of ice (I use a level full 16 oz. red disposable plastic cup)

Blend on low for a few seconds, then turn it up to medium for a few more seconds. End with it on high until it is well blended. Sometimes we have to add a bit more water so it flows smoothly. Other times we have to add a few more pieces of ice to thicken it.

DRINK SLOWLY!!!!!! This drink will cause a brain freeze VERY FAST so please drink responsibly.

Pecan Pie

Line a 9″ pie plate with an unbaked pie crust. Crimp the edges to create a nice pie crust edge! Set aside.

  • Beat together in a large bowl: 3 eggs
  • Add to the eggs:
  • 1/2 c. granulated sugar
  • 1/2 c. brown sugar
  • 1 c. corn syrup (light or dark)
  • 3 T. butter (soft or cut into pieces)
  • Mix well & then stir in: 1 1/2 c. pecan halves

Pour the filling into the pie plate. Bake in a preheated oven at 350 degrees for 50-60 minutes. Cool before serving.

Canned Peaches

I am having a hard time with this recipe. It’s long and detailed. I am going to make a video of the process this year and post it! That is much easier. IN THE MEANTIME, here is my best attempt. Please don’t let the many words overwhelm you. It really is a simple process. It takes TIME, but it is basic and simple. Enjoy the process!

  1. Prepare your kitchen. Make sure it’s clean. We will set up the kitchen as we go and it’s easiest to start with an empty/clean kitchen. The fewer items on the counter tops, the less clean up later.
  2. Get your peaches set on the counter or floor (if you have them in baskets or boxes) near the stove. How many peaches do you have? I go by weight. I figure that 2 pounds of peaches slice up into 1 quart jar. So if you have a 20 pound box of peaches you will maybe use 10 quart jars. Of course this depends on how tight packed you make them.
  3. Wash your jars and set them on a large bath towel next to the kitchen sink.
  4. Set your rings for the jars in a bowl or bucket next to the stove.
  5. Put the correct amount of lids in a 2-3 quart small pot. Make sure the rubber ring inside is facing up and not stacked on each other so that the water softens each one. Fill the pot with water, covering the lids with about an inch of water. Place it on a burner that is NOT turned on yet.
  6. Fill a stock pot about 3/4 of the way full. Place the lid on it. Put it on a burner, turn on HIGH and bring to a full boil as you prepare the other stations for the canning process.
  7. Place your blanching tool near the peaches and the stock pot of boiling water. I use an old deep fryer basket. It fits in my stock pot perfectly! Some people use a ladle and that works fine, too. It just takes more time. (I also set a hot pad at this “station” because I use it while blanching!)
  8. The next thing to prepare is the kitchen sink area. I use a Rubber Maid kitchen sink tub filled with COLD water for dumping the blanched peaches into. I use another one in the other sink to put the peeling into. This station also requires a sharp knife in the event you need it to peel a peach or cut off a bad spot.
  9. Now you need to set out a large bowl for the peeled peaches. They will sit while you are blanching and peeling enough peaches to process about 7 quarts at a time. That is about 14 pounds! People ask how many peaches makes 14 pounds. I DON’T KNOW! Some peaches are small and weigh 4 ounces. Some peaches are large and weigh 14 ounces. I have had peaches that are so big that I can’t just slice them off the pit. I have to cut them in half and then slice them.
  10. OK, remember that we put a large bath towel on the countertop next to the sink and placed the jars on it? Make sure that the large bowl for peaches is placed near these jars as well. Technically, I put the bowl on the towel RIGHT NEXT TO THE SINK and the jars to the other side of the bowl. So really, the jars are NOT right next to the sink, they are the other side of the bowl. And I also make sure that there is a knife to slice the peaches near the jars and bowl.
  11. Get your canning jar funnel. I actually have 2. They are cheap! They help the processing of peaches go much faster. One of these funnels gets placed on the empty jars. The other one will be placed with the syrup station.
  12. Get a second stock pot and lid. Make the sugar water/syrup to pour over the peaches in the jars. I put ONE cup of sugar for THREE cups of water. Stir until the sugar is mostly dissolved. Place it on the burner on high. I use a single burner that plugs into the wall and sets on the counter top for this pot. It doesn’t take up stove top burner space and it’s handy to have right next to the filled jars of peaches. I use my second funnel on these jars to fill with the syrup. To pour the syrup into each jar, I use a glass 2-cup measure cup/pitcher. It can withstand the hot syrup and still pours nicely.
  13. Set up an area next to the stove that the jars can be placed on after being filled with syrup. I use a hand towel and process 7 jars at a time since that is how many fit in the hot water bath canner at a time. I use a plastic air bubble tool at this station. This is also where the lids and rings are at, to place on each jar and then into the hot water bath canner pot at that same place (if possible).
  14. Yes. The hot water bath canner. (NOT A PRESSURE CANNER). Fill it about half full with hot water. Place on the burner you will use for canning. Put the lid on it. Do not turn the burner on yet.
  15. All of the above stations are easiest if they are lined up and ready to go directly from one to the next so that you aren’t crossing the kitchen floor each time you process the next step. This last station is not. It is set up out of the way. Shucks, I have put a folding table in the corner of the living room sometimes just so the jars are out of the way. So, set up a table or something (or just the far corner of the kitchen counter). Place a large bath towel on it. You will also want your jar lifter placed here. It is best to use to remove the hot jars from the canner. There have been times when we can’t find the jar lifter tool or didn’t even have one! I used a hot pad mitt a few times. I have also used a hand towel. They get hot and wet, but they work! Your jars will be setting here for at least 24 hours.

Whew! That was the instructions for the set up! Don’t be scared off by it. Keep following instructions. If you get a good set up of your stations, the process will actually flow nicely and it will be a pleasant experience. Now let’s try writing out the process to actually can peaches!!!! The prep is done. Let’s do this!

  1. Make sure your blanching water is boiling hard. It boils so hard that if you are canning 50 pounds of peaches (or more) you will probably have to add water to this pot. You can judge as you learn the process.
  2. Select RIPE peaches (you know it is ripe if the skin peels back easily at the stem of the peach). You would actually like an over ripe peach because it’s easier to peel and they taste better after being canned. Unripe peaches are miserable to peel and are more bland, less peach tasting, after being canned. You are better off waiting a day or two or three for ripe peaches than trying to can unripe peaches. Store peaches are generally UNDER ripe. That is why they are more hard and tasteless. ****** OK, select ripe peaches and place them in your basket.
  3. STOP! THE COLD WATER! Go put the COLD water running into the kitchen sink tub set up for putting the blanched peaches into.
  4. Set your basket of peaches into the boiling water and place the lid on it. This is the tricky part. For how long? Yeah, I ask that question every year. It all depends on how hot the water is, how ripe the peaches are, and how patient you are. Try the first test with ONE peach. Leave it in for 15 seconds. If it works good, fill your basket and process for 15 seconds. If that’s not good, go for 20 seconds. Sometimes I’ve had to go 30 seconds, but by then it’s starting to cook into the peach and maybe those peaches aren’t so ripe and the peel will have to be cut off. So it’s a guessing game on the first few.
  5. Now. The peaches are at the 20 second time. Grab the hot pad. Lift the lid handle with the hot pad. Turn the lid upside down in your hand. Take the basket out of the water and put it dripping onto the lid. Make a mad dash to the kitchen sink and dump the peaches into the cold water tub. Turn off the water if the tub is full (or remember to come back and turn it off when it’s full).
  6. Take your basket back to your ripe peaches and repeat steps 4 and 5. You can decide how you do it. Because I am always canning with many people (at least one person per station is standard), I just keep this process going. If you are doing this alone, you can chose to blanch several times and then peel, or else peel right away, or . . . I personally would blanch 2 batches and then take time to peel them all and repeat that process until I have enough peaches peeled to fill 7 jars. And then I would continue to process the peaches to can instead of staying at the blanching and peeling stations. You will find what works comfortably for you.
  7. Let’s move forward either way. You are peeling your peaches, dropping the skins into the empty sink tub and placing the peeled peach into the large bowl.
  8. STOP! It’s time to go put the pot of lids to boil. Turn the burner on HIGH. You should be fine as far as time goes. But you don’t want the lids boiling for 10 minutes either. It will take a few minutes to get to boiling point and then maybe they should boil for 3-5 minutes. And then leave the burner on medium because you want the rubber nice and soft!!!!
  9. Time to slice into jars. Place the funnel on one jar. Grab a peach in one hand and a nice slicing knife in the other. Slice your peach right off the pit. I generally make 8 pieces out of one peach. I DO NOT cut the peach in half and remove the pit. I literally slice the peach, having the peach positioned over the canning jar funnel so that the slice falls off the pit and into the jar. It is so fast and easy. I end up with the pit falling out on its own. I drop the pit in the kitchen sink tub of peelings and finish whatever slices need to be made on the peach in my hand and then drop them into the funnel as well. I continue slicing peaches until the peaches are starting to fill the funnel. I then thump the jar on the towel covered counter top until the slices are settled into the jar. Remove the funnel and place it on the next empty jar. Put the full jar onto the other end of the towel next to the syrup pot. Continue slicing and filling jars until all 7 jars are full.
  10. Syrup time. Place the funnel on the jar full of peaches. Stir your pot of hot syrup. You do not want it boiling, but it should be fairly hot. I usually just leave my burner on low the whole time and it’s good. Fill each jar with syrup.
  11. Place the jars that are full of peaches and syrup at the next station. The jars are on the hand towel. Use your tool to remove air bubbles at this time. Sometimes you will have to add a bit more syrup, but generally it will be a good level of syrup (that would be the typical 1/2″ headspace. I like the syrup to be right at the bottom of the ring part).
  12. Some people wipe each jar rim with a damp cloth at this time in the processing. I have in years gone by. How I just get my hands wet and do a quick swipe across the jars. This is to wipe away any excess syrup or any peach drippings that are on the rim. This is wise to do because if it is dirty the jar might not seal OR maybe mold would grow if jars are not washed after processing.
  13. Time to put a lid on it. Time to put a ring on it. Your lids pot was boiling. You can turn it off. Take one lid out. Place it with the rubber side down onto a jar. Place a ring on the jar. Firmly turn the ring onto the jar but don’t crank it down so tight that you can’t remove it after the whole process!!!
  14. Place the completed jar onto the water bath canner rack. Turn the burner on HIGH for the water bath canner. Continue putting on lids and rings. When the canner rack is full, place it into the water. Add more hot water if necessary to bring the water level up to the ring. Put the lid on. Now watch for when it comes to a full boil. Not just one or 2 bubbles. Many boils. Like a real boiling pot.
  15. Set the timer for 20 minutes. OK. some people think the process should be 25-30 minutes. I get it. I would rather you be safe than sorry. But I have done the 20 minutes for 27 years and it’s been fine. Do what you are comfortable with. (If you are canning PINT size jars, you can boil them for a full 15 minutes. Many times I am adding pint jars in with the quart jars and so they get processed for 20 minutes. If I were processing pints alone, I might go for 18 minutes just to feel better!)
  16. When the timer goes off, bring to canner pot to the area that you are putting the jars to stay for 24 hours. If you are not strong enough, that’s ok. Just be sure you turn off the burner and remove the lid and wait a few seconds before reaching into the pot to pull out the rack of jars. Or the jars themselves. The STEAM could burn you just as much as the boiling water does. I have had more steam burns that I care to admit.
  17. Set your canned peaches about 1″ or more apart on the towel. Leave setting for about 24 hours.
  18. After about 12 hours, check the lids. If you push the lid in or if it pops out when you push the top, place the jar in the fridge and eat within a few days because it did not seal. If you put it on the shelf, you will have mold on those peaches so fast!!!
  19. When the 24 hours is up, remove the rings. Wash and dry rings for using another time.
  20. Wash and dry the jars of peaches. Place in a cool area and use as desired.

CONGRATULATIONS!!!!!

You have successfully read the directions for canning peaches like I do. I might like doing it my way. You might not. Each of us adjusts things to our comfort level. Make it your own personally so that YOU enjoy canning. I know it’s a long process. I know it is a task. I also know it can be an enjoyable time. Make it yours. Enjoy!

5 Jalapenos

In a large pot, bring to a boil:

  • 5 c. white vinegar
  • 5 c. water
  • 5 T. canning/pickling salt
  • 5 T. sugar
  • 5 T. minced garlic

Place whole or sliced jalapeno peppers into pint size jars (remember to wear gloves when handling the peppers!). You can add slices of onion if you would like. I have added a head of dill sometimes, too!

Ladle the hot mixture over the peppers. Place on lids and rings. Hot water bath process the pints for about 10 minutes in boiling water.

You now have pickled peppers!

Mom’s Cough Syrup

  • Whisk together equal parts of:
  • glycerin
  • fresh squeezed lemon juice
  • honey

Mom would give us a tablespoon of this when we had bad coughs as children. I know she would sometimes add a drip of whiskey to the batch, too. I never have, but some people say the brandy helps.

I have made this for years at the start of the coughing season. I leave it in the refrigerator in squeeze bottles for each child! When they are coughing hard they go take a squirt from the bottle with their name on it. Of course my children are old enough to know how much to use! I do not suggest doing this for a 3-year old!!! The only side effect of an “over dose” is diarrhea from too much glycerin.

Photo by Vicky Tran on Pexels.com

Honey Vinegar

When we had upset tummy as a child, my mom would have us sip on this drink. So many times the stomach flu would pass quickly. I am convinced it was because we drank this. I also know that drinking this in general is sometimes beneficial to some people even if they are not sick.

  • Stir together and drink quickly, or sip slowly over a 15 minute time frame:
  • 1/2 c. warm water
  • 2 T. apple cider vinegar
  • 1 T. honey
Photo by Mareefe on Pexels.com

Planting Guide (for Life)

First, plant 5 rows of peas:

  • Preparedness
  • Promptness
  • Perseverance
  • Politeness
  • Prayer

Next, plant 3 rows of squash:

  • Squash gossip
  • Squash criticism
  • Squash indifference

Then 5 rows of lettuce:

  • Let us be faithful
  • Let us be unselfish
  • Let us be loyal
  • Let us be truthful
  • Let us love one another

Lastly, plant turnips:

  • Turn up for church
  • Turn up with a smile
  • Turn up with determination
Photo by Lukas on Pexels.com